
Introduction to CSS
Start your introduction to CSS with this beginner-friendly guide. Learn CSS syntax, the CSS Cascade, selectors, the box model, and the basics of CSS with visual examples and real code.
As you already know, HTML gives a webpage its structure, headings, paragraphs, and buttons. But if you load a plain HTML page in a browser, it doesn’t look good. No colors, no spacing, no personality. That’s exactly where CSS steps in. This introduction to CSS will show you what CSS is, how it works, and why it’s one of the most satisfying things you’ll ever pick up as a web developer.
CSS stands for Cascading Style Sheets, it was introduced in 1996 by Håkon Wium Lie while working with Tim Berners-Lee (Founder of HTML) at CERN. It was designed to separate the content of web pages (written in HTML) from their visual presentation, such as colors, fonts, and layouts. This made websites easier to design, maintain, and style consistently across multiple pages. Over the years, CSS has evolved into powerful versions, with modern CSS3 enabling animations, responsive layouts, and advanced visual effects that bring today’s websites to life.
Let’s get into it.
01Introduction to CSS: What Exactly Is It?
CSS stands for Cascading Style Sheets. It’s the language you use to style HTML. Every color, font, margin, layout, animation, and shadow you see on a website comes from CSS.
Think of HTML as a house’s structure — walls, doors, windows. CSS is the interior design — the paint, the furniture, the lighting. One is nothing without the other.
This basic introduction to CSS isn’t going to throw 100 properties at you. Instead, you’ll understand how CSS actually works, and once you get that, everything else becomes easy and interesting to learn on your own.
02Your CSS Intro: The Very First Example
Before anything starts, let’s write some CSS. Your CSS intro starts with one line:
h1 {
  color: tomato;
}
That’s it. You just told the browser: “Every <h1> On this page, the text should be tomato colored.” That’s CSS. A selector (h1), a property (color), and a value (tomato).
You will see something like this:
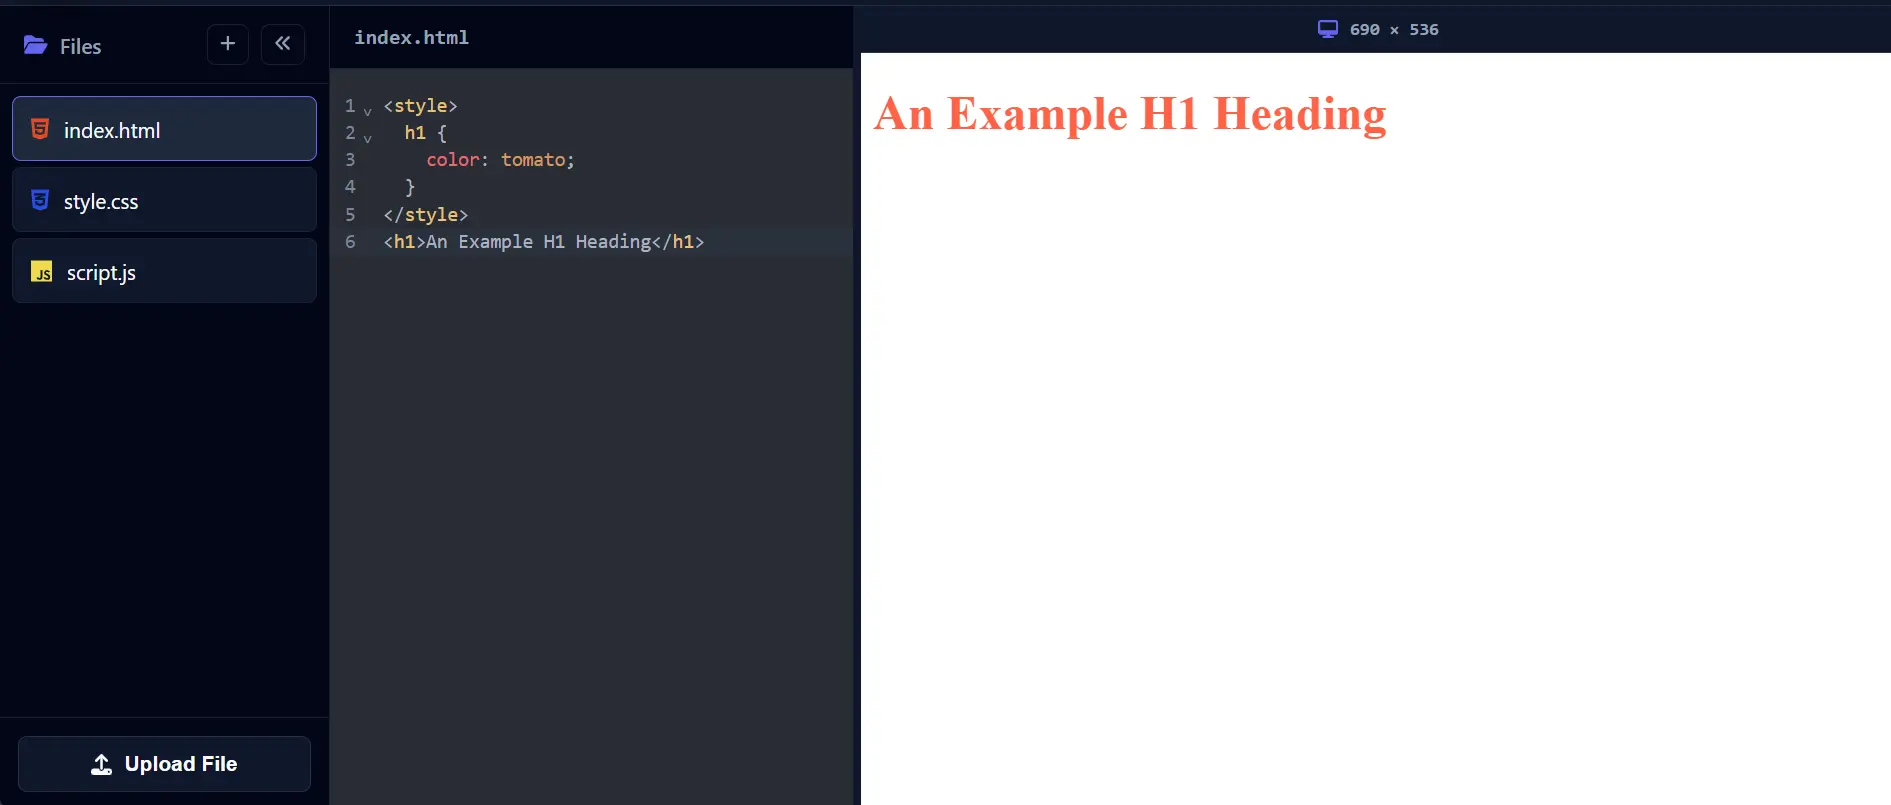
This CSS intro example is tiny, but the pattern is the foundation of everything CSS does — from a simple color change to building full page layouts.
03The Basics of CSS: Selectors, Properties, and Values
The basics of CSS are built on three things you’ll use in literally every stylesheet you ever write:
- Selector — Defines which HTML element(s) you want to style (e.g., p, h1, .class, a).
- Property — Defines what aspect of the element you want to change (e.g., color, font-size, line-height).
- Value — Defines how it should look by assigning a specific setting (e.g., blue, 16px, 2vh, #ff0000).
Here’s a complete example that puts the basics of CSS to work:
p {
  color: #cbd5e1;
  font-size: 18px;
  line-height: 1.7;
}
You’re selecting every HTML <p> tag and setting its text color, size, and line height. Simple, clear, readable. The basics of CSS don’t get more complicated in structure — they just expand in what properties are available.
Once you understand this core pattern, you can look up any property — background, border, padding, flex — and drop it right in. That’s how you learn CSS progressively.
04How to Add CSS to a Webpage
When you learn CSS, one of the first practical questions is: where does the CSS actually go? So the answer is: There are three ways.
1. Inline CSS within HTML elements
Directly on the HTML element:
<p style="color: #6366f1; font-weight: bold;">Hello, CSS!</p>Use it within the HTML elements. It’s good in some cases, but the disadvantage of doing so is that you won’t get the caching benefit, the specific plugins or services, and even the browsers cache your CSS files, but if you inline the CSS, the CSS will be loaded with the page and you won’t get the caching benefit.
2. Internal CSS (Inside <style>)
<head>
  <style>
    p {
      color: #6366f1;
    }
  </style>
</head>
Good for single-page projects or quick tests. Same as the first option, you won’t get the caching benefit.
3. External CSS (Separate File)
<head>
  <link rel="stylesheet" href="style.css">
</head>
This is the CSS best practice. One CSS file, many HTML pages. Clean, maintainable, professional. When you use CSS for real projects, you’ll almost always go this route.
05CSS Selectors: Targeting the Right Elements
A great CSS intro would be incomplete without talking about selectors properly. They’re how you tell CSS exactly what to style.
/* Element selector */
h2 {
  font-size: 28px;
}

/* Class selector */
.card {
  background: #1e293b;
  border-radius: 12px;
  padding: 24px;
}

/* ID selector */
#hero {
  text-align: center;
  padding: 80px 0;
}

/* Descendant selector */
.card p {
  color: #cbd5e1;
}
Classes (starting with .) are the ones you’ll use the most. IDs (starting with #) are for unique elements. Mastering selectors early helps you learn CSS faster because you stop wasting time fighting the browser and start feeling in control.
Live Preview — CSS Selectors in Action
Card Title
This paragraph is inside .card p — so the descendant selector targets it specifically.
Another Card
Same class, same styles. That’s the power of class selectors — write once, apply everywhere.
Both cards share the .card class — one rule styles them both.
06Understanding the CSS Cascade
Here’s where this introduction to CSS gets interesting. The “C” in CSS stands for Cascading — and the CSS Cascade is one of the most important concepts you’ll ever understand in CSS.
The CSS Cascade is the algorithm the browser uses to decide which styles win when multiple rules target the same element. It’s not random. It follows clear rules.
The CSS Cascade Follows Three Things
The CSS Cascade resolves conflicts based on:
- Origin — Where does the CSS come from? (your stylesheet, browser defaults, user settings)
- Specificity — How specific is the selector?
- Order — When multiple rules tie, the last one wins.
Let’s see the CSS Cascade in action:
/* Rule 1 — element selector, lower specificity */
p {
  color: #cbd5e1;
}

/* Rule 2 — class selector, higher specificity */
.highlight {
  color: #6366f1;
}

/* Rule 3 — ID selector, highest specificity */
#special {
  color: #ec4899;
}
<p>Normal paragraph — uses Rule 1</p>
<p class="highlight">Highlighted — uses Rule 2</p>
<p class="highlight" id="special">Special — uses Rule 3</p>The CSS Cascade decided the winner at each step based on specificity. The ID selector beats the class selector, which beats the element selector. That’s the CSS Cascade thinking for you.
CSS Cascade — Specificity Visualized
The three columns represent IDs, Classes, and Elements. Higher numbers in the left columns always win.
The Cascade and Source Order
When two rules have the same specificity, the CSS Cascade picks the one that appears last in the file. This is called source order:
/* Both are class selectors — same specificity (0-1-0) */
.btn {
  background: #6366f1;
}

/* This one comes last — it wins */
.btn {
  background: #ec4899;
}
The button ends up pink, not purple. The CSS Cascade says: “Tie in specificity? Last rule wins.” This is why the order of your CSS rules matters — it’s not random, it’s intentional cascade behavior.
07CSS Properties You’ll Use Every Day
A complete CSS intro covers the properties you’ll reach for most often. Here are the essential ones as you learn CSS in practice:
.card {
  /* Colors */
  background-color: #1e293b;
  color: #ffffff;

  /* Typography */
  font-family: 'Inter', sans-serif;
  font-size: 16px;
  font-weight: 600;
  line-height: 1.6;

  /* Spacing */
  padding: 24px;
  margin: 16px 0;

  /* Box */
  border: 1px solid rgba(255, 255, 255, 0.05);
  border-radius: 12px;

  /* Shadow */
  box-shadow: 0 10px 30px rgba(0, 0, 0, 0.38);
}
Once you see these grouped, it starts making sense. The basics of CSS really come down to: what’s the color, what’s the text, what’s the spacing, and what’s the box. That’s a mental model that’ll carry you far.
Result of the code above
This is your styled card. Colors ✓ Typography ✓ Spacing ✓ Border ✓ Shadow ✓
Every property you see here maps directly to a line in the CSS above.
08The Box Model — Every Element Is a Box
One of the most important parts of the basics of CSS to understand early is the box model. Every single HTML element — a heading, a button, an image — is a rectangular box made of four layers:
The CSS Box Model
Content → Padding → Border → Margin. From the inside out.
.box {
  /* Content area */
  width: 300px;
  height: 150px;

  /* Space inside the border */
  padding: 20px;

  /* The visible edge */
  border: 2px solid #6366f1;

  /* Space outside the border */
  margin: 16px;
}
Understanding the box model is one of those moments where the basics of CSS suddenly make the browser feel less like magic and more like math. And that’s a great feeling.
09CSS Colors — More Ways Than You Think
As you learn CSS, you’ll quickly discover there are multiple ways to write colors. All of these are valid:
.text-examples {
  /* Named colors */
  color: tomato;

  /* Hex */
  color: #6366f1;

  /* RGB */
  color: rgb(99, 102, 241);

  /* RGBA — with opacity */
  color: rgba(99, 102, 241, 0.6);

  /* HSL */
  color: hsl(239, 84%, 67%);
}
For real projects, hex and rgba are the most common. This CSS intro to colors barely scratches the surface — CSS also has gradients, custom properties for reusable colors, and more.
10CSS Variables — Write Less, Change More
Here’s something that’ll make you genuinely happy as you learn CSS: CSS Custom Properties, also called CSS variables.
:root {
  --accent: #6366f1;
  --text: #ffffff;
  --bg-soft: #1e293b;
}

.button {
  background: var(--accent);
  color: var(--text);
}

.card {
  background: var(--bg-soft);
  border: 1px solid var(--accent);
}
Define a color once in :root. Use it everywhere with var(). Want to change your brand color? Change one line. Everything updates. This is a basic CSS trick that professional developers swear by — and now you know it too.
11A Real-World CSS Intro Example: Styled Button
Let’s wrap this CSS intro section with something you can actually use — a complete styled button:
.btn {
  display: inline-block;
  padding: 12px 28px;
  background: #6366f1;
  color: #ffffff;
  font-size: 15px;
  font-weight: 600;
  border: none;
  border-radius: 999px;
  cursor: pointer;
  transition: background 0.2s ease, transform 0.1s ease;
}

.btn:hover {
  background: #4f46e5;
  transform: translateY(-2px);
}That button uses hover states, transitions, and border-radius — all things you’ll use daily once you learn CSS properly. And the code is clean enough that you can read it top-to-bottom and understand every single line.
12The CSS Cascade and Inheritance
There’s one more part of the CSS Cascade worth knowing before you move on: inheritance. Some CSS properties are inherited by child elements automatically.
<div style="color: #6366f1; font-family: 'Inter', sans-serif;">
  <p>This paragraph inherits the color and font.</p>
  <span>So does this span.</span>
</div>
Set color or font-family on a parent, and all children pick it up — thanks to the CSS Cascade. Properties like background, border, and padding do not inherit. That’s by design, and once you know the pattern, it saves you from writing repetitive CSS.
13What to Learn Next After This CSS Intro
This introduction to CSS covered the core concepts that every beginner needs. You now understand what CSS is, the basics of CSS syntax, how selectors work, how to add CSS to a page, what the box model is, and how the CSS Cascade decides which styles apply.
From here, your path forward is clear. As you continue to learn CSS, the next topics to explore are:
- Flexbox — the easiest way to align and distribute elements
- CSS Grid — for building real two-dimensional layouts
- Responsive Design — making your site look great on all screen sizes with media queries
- CSS Animations — bring things to life with keyframes
- Pseudo-classes and Pseudo-elements — like
:hover,:focus,::before,::after
The best way to learn CSS is to build things. Take the examples from this CSS intro, tweak them, break them, and fix them. That’s how the basics of CSS go from “I’ve read about this” to “I actually know this.”
CSS rewards practice more than any other web technology. You’ll feel clumsy for the first hour, comfortable after a week, and genuinely creative after a month. Stick with it — the results are visible, immediate, and satisfying. Stay tuned!.
Introduction to CSS
Loading challenge…
Ready to Practice?
Select a difficulty level above to load your challenge.